Contributing guidelines#
Code bugs and issues#
If you notice a bug or an issue, the best thing to do is to open an issue on the GitHub repository.
Coding conventions#
The code has been developed following the PeP8 standard and the python Zen. If you have any doubts, try
import this
Documentation#
Every function or class should be documented using docstrings which follow numpydoc structure. This web page is written using the reStructuredText format, which is parsed by sphinx. If you want to contribute to this documentation, please refer to sphinx documentation first. You can improve this pages by digging into the docs directory in the source.
To help the contributor in writing the documentation, we have created two nox sessions:
$ nox -s docs
$ nox -s docs-live
The first will build the documentation and the second will build the documentation and open a live server to see the changes in real time. The live server can be accessed at http://127.0.0.1:8000/
Note
To run a nox session, you need to install it first. You can do it by running:
$ pip install nox
Testing#
Unit-testing is very important for a code as big as ExoSim 2. At the moment ExoSim is tested using unittest. If you add functionalities, please add also a dedicated test into the tests directory. All the tests can be run with
python -m unittest discover -s tests
Logging#
Logging is important when coding, hence we include a exosim.log.logger.Logger class to inherit.
import exosim.log as log

class MyClass(log.Logger):
    ...
Now the new class has the following methods from the main Logger class.
self.info()
self.debug()
self.warning()
self.error()
self.error()
where the arguments shall be strings.
The logger output will be printed on the run or stored in the log file, if the log file option is enabled.
To enable the log file, the user can refer to exosim.log.addLogFile.
Note
The logger here produced is inspired by the logging classes in TauREx3 developed by Ahmed Al-Refaie.
The user can also set the level of the printed messaged using exosim.log.setLogLevel, or enable or disable the messaged with exosim.log.enableLogging or exosim.log.disableLogging
If the contributor wants to trace every time a function is called, the exosim.log.logger.traced decorator comes handy:
import exosim.log as log

@log.traced
def my_func(args):
    ...
This will produce a log everytime the function is entered and exited with a TRACE logging level.
Versioning conventions#
The versioning convention used is the one described in Semantic Versioning (semver) and is compliant to PEP440 standard. In the [Major].[minor].[patch] scheme, for each modification to the previous release we increase one of the numbers.
Major is to increased only if the code in not compatible anymore with the previous version. This is considered a Major change.
minor is to increase for minor changes. These are for the addition of new features that may change the results from previous versions. This are still hard edits, but not enough to justify the increase of an Major.
patch are the patches. This number should increase for any big fixed, or minor addition or change to the code. It won’t affect the user experience in any way.
Additional information can be added to the version number using the following scheme: [Major].[minor].[patch]-[Tag].[update]
Major is to increased only if the code in not compatible anymore with the previous version. This is considered a Major change.
minor is to increase for minor changes. These are for the addition of new features that may change the results from previous versions. This are still hard edits, but not enough to justify the increase of an Major.
patch are the patches. This number should increase for any big fixed, or minor addition or change to the code. It won’t affect the user experience in any way.
Tag is a string that can be added to the version number. It can be used to indicate the type of release, or the type of change. For example, alpha, beta, release or dev can be used to indicate that the version is not stable yet.
updated is a number to increase for all the changes that are not related to the code patch. This is usefull for development purposes, to keep track of the number of updates since the last release.
See also What versioning system is used?.
The version number is stored in the version keyword of the setup.cfg file.
Automatic update of the version number#
The version number is automatically updated by bump2version. The user can update the version number by running
bump2version --current-version Major.minor.patch --new-version Major.minor.patch patch
Note
To run bump2version, you need to install it first. You can do it by running:
$ pip install bump2version
The same can be done for minor and major changes.
However, the best practice is to use the routine included in the nox configuration file as dedicated session.
nox -s release -- Major.minor.patch -- "short description of the changes"
which will update the version number, commit the changes and tag the commit with the new version number.
The short description of the changes will be added to the Changelog file as the new version title.
It should be a couple of words describing the changes.
The nox command will also update the Changelog files.
Note
The nox command will not create a new release on GitHub. This has to be done manually.
Note
To run a nox session, you need to install it first. You can do it by running:
$ pip install nox
Before running the nox command to update the version number, the user should run the linters included in the pre-commit routine to avoid errors.
It can be run with
$ pre-commit run --all-files
if pre-commit is installed, or
nox -s lint
Source Control#
The code is hosted on GitHub (arielmission-space/ExoSim2-public) and structured as follows.
The source has two main branches:
master: this is used for stable and releases. It is the public branch and should be handled carefully.develop: this is the working branch where the new features are tested before being moved on to the master branch and converted into releases.
Adding new features#
New features can be added to the code following the schemes designed above.
If the contributor has writing rights to the repository, should create a new branch starting from the develop one. In the new feature branch the user should produce the new functionalities, according to the above guidelines. When the feature is ready, the branch can be merged into the official develop one.
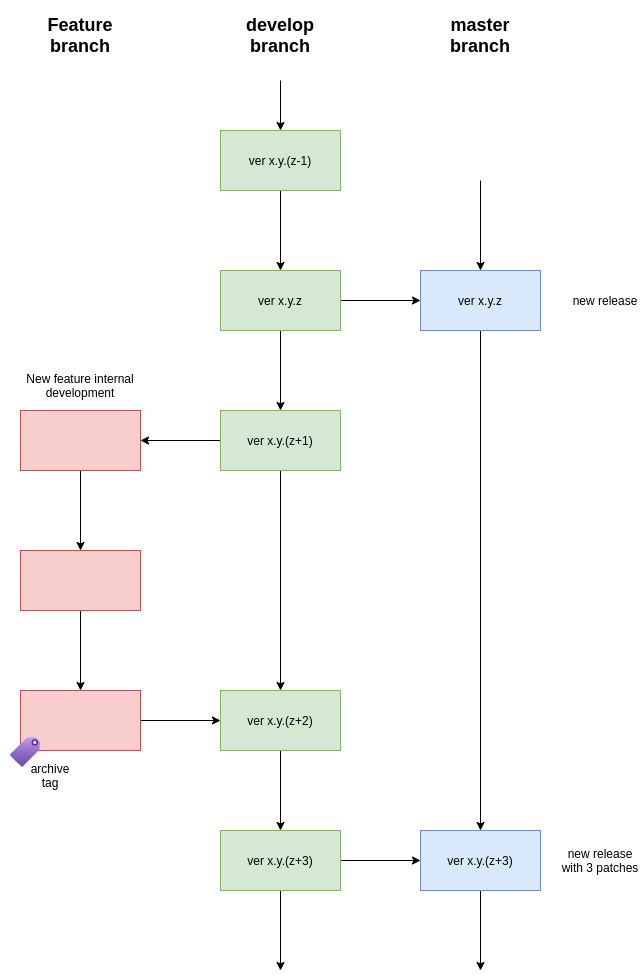
To create the new feature starting from the current develop version, the contributor should run
git checkout develop
git checkout -b feature/<branchname>
The completed feature can then be added to the develop. This can be done in two ways: by a merge or a pull request.
Merge#
A merge is a soft way to add a new feature to another branch. Performing a Merge mean that the change will be applied if according to gitHub there two branch are compatible.
git merge develop
git checkout develop
git merge feature/<branchname>
git push
Once a feature is completed and merged, the contributor should archive` the branch and remove it, to keep the repository clean. The usual procedure is:
git tag archive/<branchname> feature/<branchname>
git push --tags
git branch -d feature/<branchname>
Remember to delete the branch also from the remote repository. If needed, the feature branch can be restored as
git checkout -b <branchname> archive/<branchname>
Fixing bug#
The procedure to fix a bug is similar to the one for adding a new feature.
Create the new branch starting from the current develop versionn
git checkout develop
git checkout -b fix/<branchname>
Then, once the bug is fixed, the branch can be merged into the official develop one.
git merge develop
git checkout develop
git merge fix/<branchname>
git push

git tag archive/fix/<branchname> fix/<branchname>
git push --tags
git branch -d fix/<branchname>
Pull request#
A similar result can be obtained by the gitHub web interface. When the feature is completed, the contributor can visit the branches tab of the gitHub page. From there it is possible to advance a pull request by clicking on the bottom on the right of the branch we want to merge. Then select develop as destination branch and confirm. GitHub will run all the python tests written for ExoSim 2 and check for compatibility between the two branches. If everything is ok a merge can be confirmed.
Then, in the branches page is possible to delete the new feature branch, if it is not useful anymore.
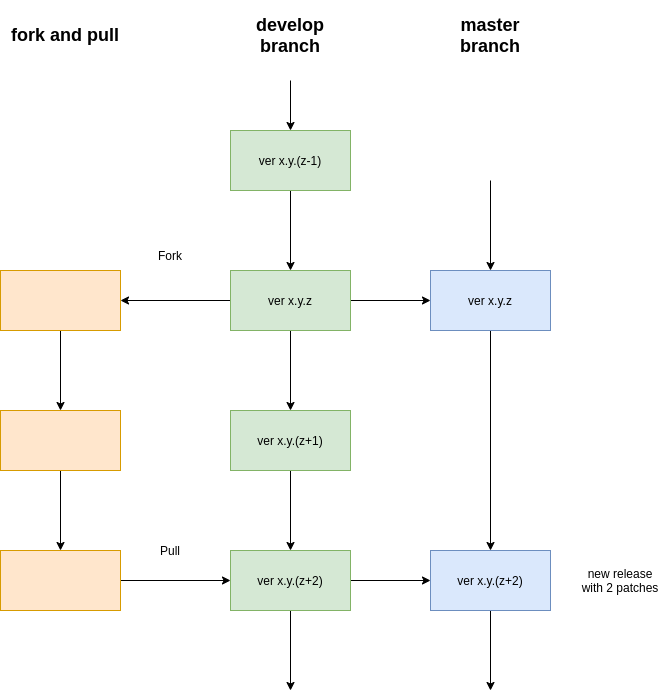
Fork and Pull#
If the contributor does not have writing rights to the repository, should use the Fork-and-Pull model. The contributor should fork the main repository and clone it. Then the new features can be implemented. When the code is ready, a pull request can be raised.
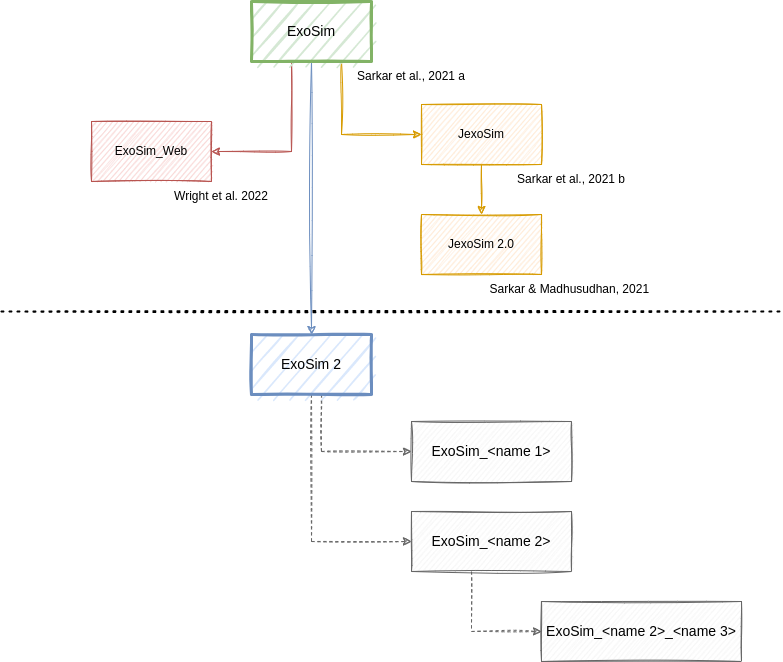
Derived projects#
If the contributor wants to maintain a custom forked repository or derived project, the following naming convention should be followed: the forked repository should be named after the original repository plus an identifying name. The following picture shows an example of a possible growth of the ExoSim family:
Automatic actions#
Every time a commit is pushed into the develop or into the main branch, some automatic actions are run by GitHub.
The available action are stored into the .github/workflows directory in this repository.
The basic actions are three:
Linux OS (ci_linux.yml): this action run all the tests implemented in the repository for a Ubuntu virtual machine with Python 3.11 to 3.14.
If all the tests for each action are passed, a green badge will be added to the repository readme.