User guide#
This guide walks you through ExoSim 2 one pipeline at a time. Each section documents a stage of the simulation and the functionality it provides, with worked examples.
ExoSim 2 is built from a set of pipelines, called recipes. The figure below shows how they fit together:
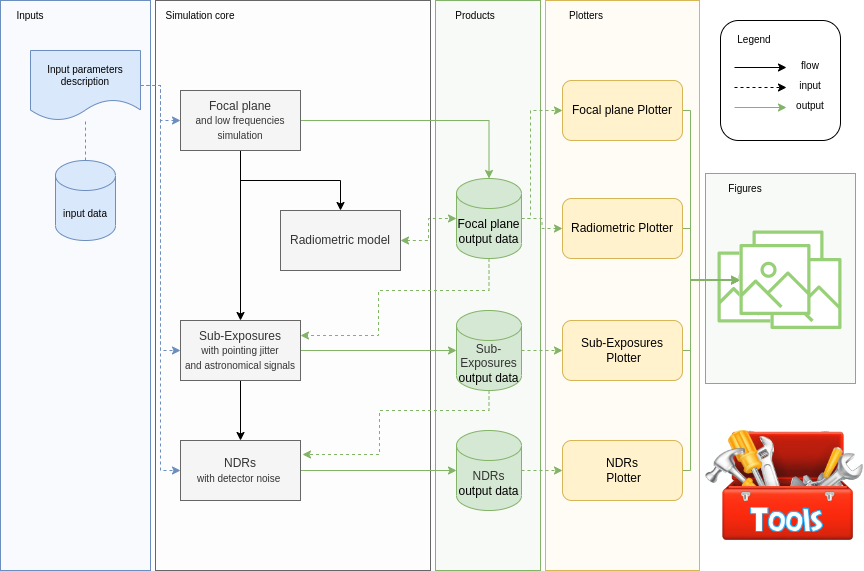
On the left are the inputs; this guide introduces each one at the point where it is needed. The grey area holds the recipes, the pipelines that produce the simulated observation. The green column is the output: ExoSim writes one file per pipeline, so you can change the configuration between recipes without re-running everything, since the output of one recipe is the input of the next. The plotters are in yellow, and the figures they produce are on the far right.
The starting point is the focal plane. From its output file the radiometric model, the sub-exposures and then the NDRs can be run in turn. ExoSim also ships a set of tools that help you prepare the inputs.
Launch ExoSim from the console and read its outputs.
Build the instrument focal plane and its low-frequency time evolution.
Fast estimates of signal, noise and saturation for performance studies.
Jitter the focal planes, add the astronomical signal, and build the sub-exposures.
Pass the sub-exposures through the detector to produce the NDRs.
Quick-look plots for every pipeline product.
Helpers that prepare maps, coefficients and reading schemes.