Pixel non-linearity#
This tool produces the pixel non-linearity coefficients that ExoSim needs as input, starting either from physical assumptions or from the non-linearity correction that is measured in the lab.
The detector non-linearity is usually written as a polynomial,
where \(Q_{det}\) is the charge read by the detector and \(Q\) is the ideal count, \(Q = \phi t\), with \(\phi\) the number of electrons generated per unit time and \(t\) the elapsed time. The tool retrieves the \(a_i\) coefficients.
From physical assumptions#
The PixelsNonLinearity tool derives
the \(a_i\) coefficients from a simple physical model of the pixel.
Treating the pixel as a capacitor, the collected charge is
where \(\tau\) is the capacitor time constant, so the product \(\phi \tau\) is constant, and \(Q = \phi t\) is the response of an ideal linear detector.
The pixel is taken to be saturated when the charge at the well depth, \(Q_{det, \, wd}\), falls 5% short of the ideal well depth \(Q_{wd}\):
so that
Solving this numerically gives
and therefore
which a 4th-order Taylor expansion approximates as
The result is the set of coefficients for a 4th-order polynomial:
The only input needed is the saturation level, well_depth:
<channel> channel_name
    <detector>
        <well_depth> 25000 </well_depth>
    </detector>
</channel>
Then run the tool:
import exosim.tools as tools

tools.PixelsNonLinearity(options_file='tools_input_example.xml',
                         output='pnl_map.h5')
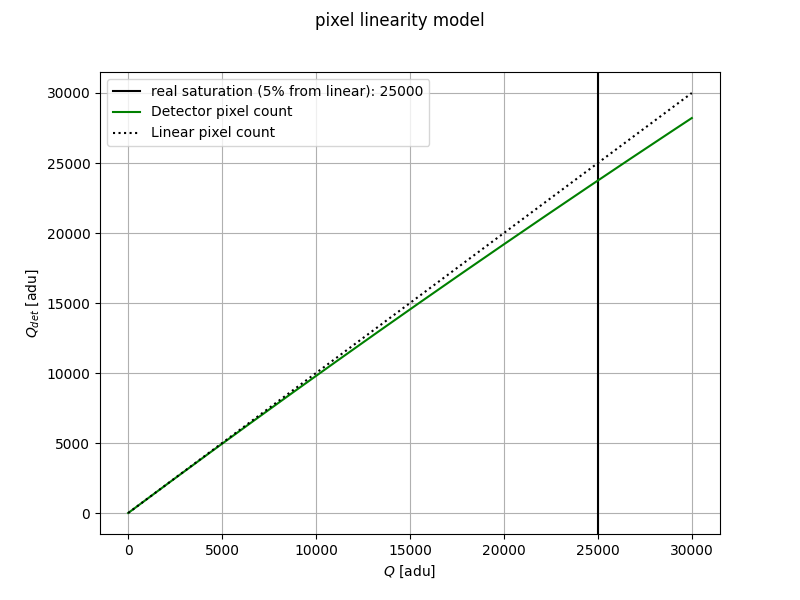
With this example, the expected non-linearity shape is:
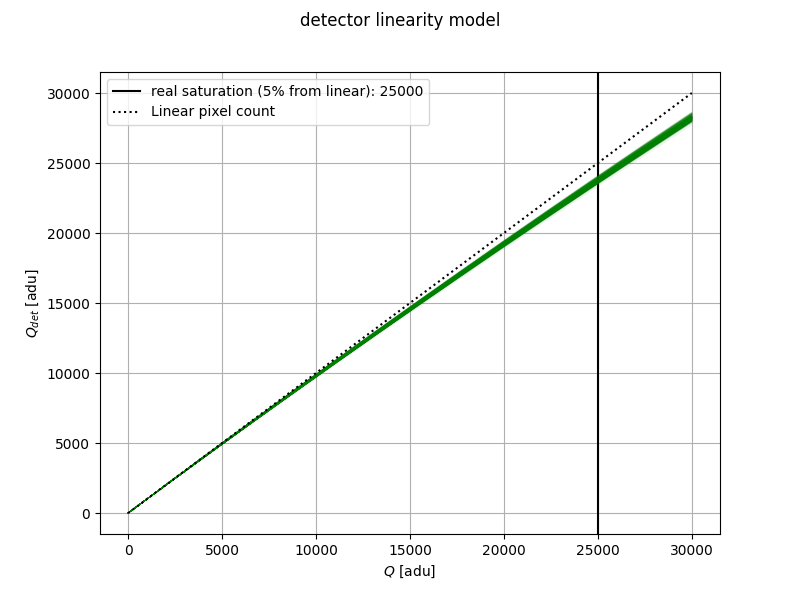
No two pixels are identical, so the tool also produces a map with a set of coefficients per pixel. Each coefficient is drawn from a normal distribution around its mean value, with the standard deviation given in the configuration; if no standard deviation is given, the coefficients are held constant.
<channel> channel_name
    <detector>
        <spatial_pix> 200 </spatial_pix>
        <spectral_pix> 200 </spectral_pix>
        <pnl_coeff_std> 0.005 </pnl_coeff_std>
    </detector>
</channel>
Here the detector sizes and the coefficient spread have been added to the configuration, giving:
The output is a map of \(a_i\) coefficients per pixel, which feeds
ApplyPixelsNonLinearity.
From measured correction coefficients#
Write the non-linearity model as
where \(\bigtriangleup\) is the operator that relates \(Q_{det}\) to \(Q\), and its meaning depends on how the coefficients \(a_i\) are defined.
In practice it is the inverse relation that is measured, since its coefficients can be found empirically:
where \(\bigtriangledown\) is the inverse of \(\bigtriangleup\). Depending on how the non-linearity was estimated, this operator is either a division (\(\div\)) or a multiplication (\(\times\)); if it is not specified, a division is assumed.
The
PixelsNonLinearityFromCorrection
tool converts the measured correction coefficients \(b_i\) into the
\(a_i\) coefficients that ExoSim uses.
List the \(b_i\) coefficients in the configuration with the pnl_coeff
keyword, in alphabetical order: pnl_coeff_a for \(b_1\), pnl_coeff_b
for \(b_2\), pnl_coeff_c for \(b_3\), and so on. Any number of
coefficients can be listed and they are parsed automatically. Note that with this
notation \(b_1\) is not forced to be unity.
<channel> channel_name
    <detector>
        <well_depth> 25000 </well_depth>
        <pnl_coeff_a>  1.00117667e+00 </pnl_coeff_a>
        <pnl_coeff_b> -5.41836850e-07 </pnl_coeff_b>
        <pnl_coeff_c> 4.57790820e-11 </pnl_coeff_c>
        <pnl_coeff_d> 7.66734616e-16 </pnl_coeff_d>
        <pnl_coeff_e> -2.32026578e-19 </pnl_coeff_e>
        <pnl_correction_operator> / </pnl_correction_operator>

        <pnl_coeff_std> 0.005 </pnl_coeff_std>
    </detector>
</channel>
The example coefficients above are taken from Hilbert 2009, “WFC3 TV3 Testing: IR Channel Nonlinearity Correction” (link).
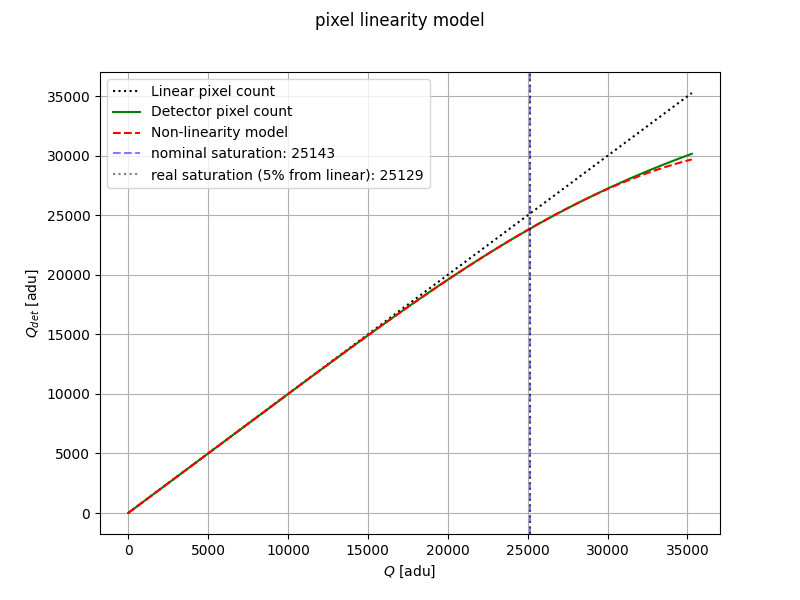
The tool retrieves the \(a_i\) coefficients for a 4th-order polynomial,
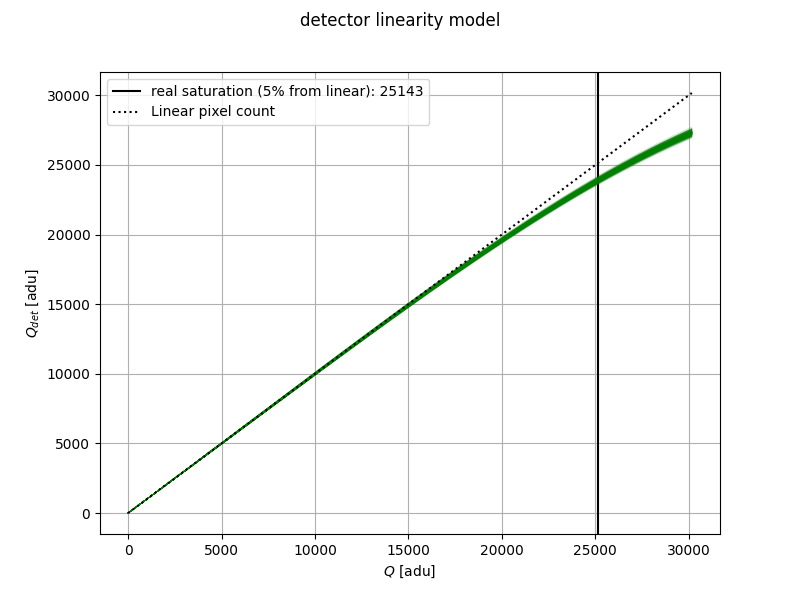
giving the expected non-linearity shape:
As before, it also produces a per-pixel map of the coefficients: